Searching for a DVIR checklist usually means one thing: you need a form you can put in front of a driver today, not another explainer on why inspections matter. This page gives you both. Below is a free, downloadable DVIR form built around the exact categories drivers need to inspect, followed by a complete DVIR checklist walking through each section, how to complete and submit the form correctly, and where paper forms fall short compared to a digital DVIR checklist.
Whether you’re standing up a DVIR process for the first time or replacing a form that’s grown out of date, the goal here is the same: a checklist a driver can actually use during a walk-around, that captures what a fleet manager or mechanic needs to act on a defect, and that holds up if a regulator ever asks to see it.
Download the Free DVIR Form Template
The template covers every section a compliant DVIR needs: vehicle information and a review of the previous inspection report, a full inspection checklist organized by system, a defect notes section, and signature lines for the driver, the mechanic or carrier representative, and the next driver. It’s built to be printed and used on paper or adapted into a digital DVIR checklist, and it follows the same structure detailed below so nothing gets missed between the form and the process.
Use it as-is for a single vehicle type, or treat it as a starting point and adjust the checklist items to match your specific trucks, trailers, or buses. A form built around a straight truck won’t cover everything relevant to a passenger bus or a tractor pulling a specialized trailer, so the categories below are meant to be a foundation, not a rigid final answer.
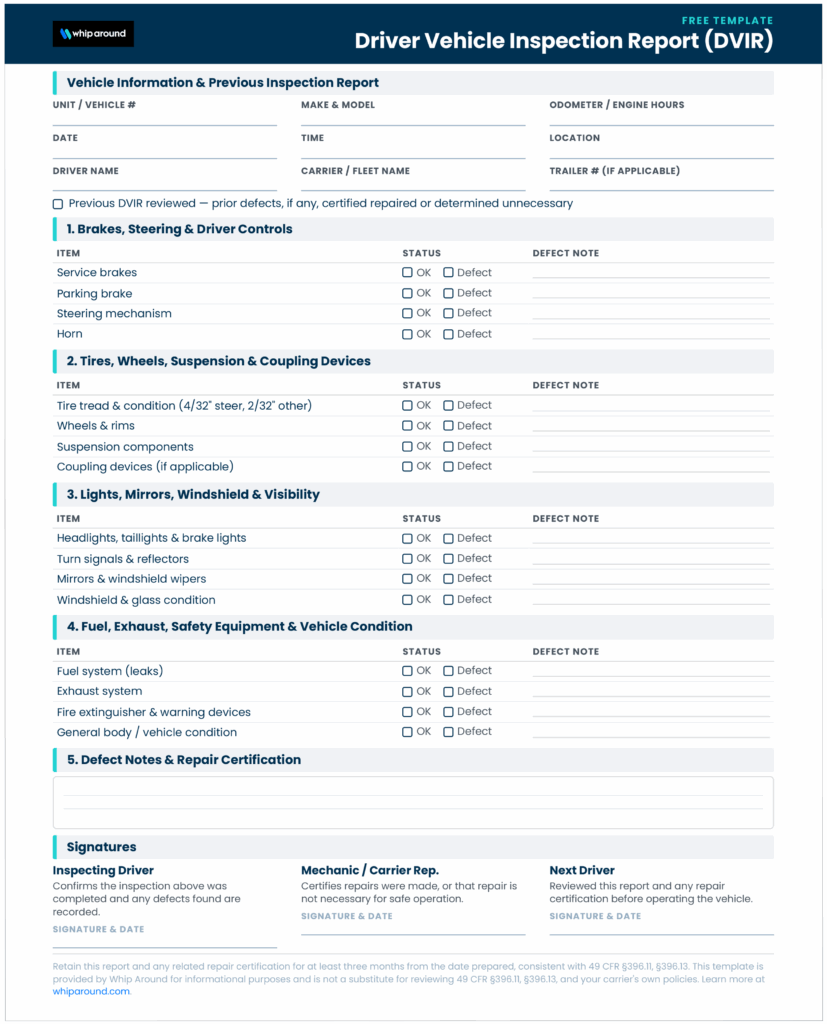
Download Free DVIR Form Template – Click Here
Complete DVIR Checklist: What Drivers Need to Inspect
A DVIR checklist is only useful if it matches what a driver can actually see and test during a walk-around. The categories below cover the systems most fleets need to inspect on a tractor, straight truck, bus, or trailer, organized the way a driver would actually move around the vehicle. For the fuller regulatory picture behind these categories, including how they connect to annual and roadside inspections, see FMCSA vehicle inspection requirements.
1. Vehicle Information and Previous Inspection Report
Every DVIR starts with basic identification: unit number, make and model, odometer or engine hour reading, and the date, time, and location of the inspection. Before driving, the driver also needs to review the previous DVIR on file and confirm that any required repairs were completed and certified. This step is easy to skip, but it’s the one that closes the loop between a defect reported yesterday and a repair confirmed today. Skipping it is how a driver ends up operating a vehicle that was flagged the day before and never actually got fixed.
2. Brakes, Steering, and Driver Controls
Check service brakes and the parking brake for proper function, along with the steering mechanism for excessive play and the horn for a clear, working signal. These are the systems most closely tied to whether a driver can actually control the vehicle, and brake-related issues are consistently among the most common defects found during roadside inspections. A soft pedal, uneven braking, or a parking brake that doesn’t fully hold are all worth flagging even if the vehicle otherwise seems to drive fine.
3. Tires, Wheels, Suspension, and Coupling Devices
Inspect tread depth against the minimum standard (4/32″ on steer axle tires, 2/32″ on all others), tire condition and inflation, wheel and rim condition, suspension components, and coupling devices on any combination vehicle. A trailer or tractor with a compromised coupling device is one of the more serious defects a walk-around can catch before it becomes a roadside issue, and cracked rims or badly worn suspension components tend to get missed on a rushed inspection precisely because they don’t announce themselves the way a flat tire does.
4. Lights, Mirrors, Windshield, and Visibility
Confirm headlights, taillights, brake lights, turn signals, and reflectors are all working, along with mirrors, windshield wipers, and the condition of the windshield and other glass. Visibility issues are easy to underestimate during a daytime inspection and much harder to ignore the first time a driver needs those lights after dark or hits weather that a cracked wiper blade can’t clear.
5. Fuel, Exhaust, Safety Equipment, and Vehicle Condition
Check the fuel system for leaks, the exhaust system for damage or excessive noise, and confirm required safety equipment, fire extinguisher, warning devices or triangles, is present and accessible. This category also covers general vehicle condition: body damage, loose panels, or anything else that affects safe operation but doesn’t fall neatly into the other categories. None of these are the first thing a driver thinks to check, which is exactly why they belong on the form instead of relying on memory.
6. Defect Notes, Signatures, and Repair Certification
If a defect is found, it needs to be documented with enough detail that a technician can act on it without guessing, a photo and a specific note, not just “brakes issue.” The inspecting driver signs the report. A mechanic or authorized carrier representative then signs to certify the repair was made or that it isn’t necessary for safe operation. The next driver to operate the vehicle reviews and signs off on that certification before their trip, which is the signature fleets most often lose track of because it depends on the report reaching them before they start. A form that only has room for a driver’s initial signature is missing two-thirds of the record a real defect actually needs.
How to Complete and Submit a DVIR Form Correctly
The exact requirement depends on whether a defect is found, and getting this distinction right is where a lot of fleets overcomplicate their process. Pre-trip and post-trip inspections aren’t governed by one blanket “sign it every time” rule. They’re two different steps with two different standards, and treating them as identical is how fleets end up either over-documenting or, worse, missing the specific case where a signed report actually is required.
Before operating the vehicle, the driver has to be satisfied the vehicle is in safe condition, review the prior DVIR on file, and confirm any noted repairs were completed. That’s a driver inspection requirement, not a paperwork requirement in itself.
If the inspection turns up a defect or deficiency that affects safety or could cause a breakdown, the driver completes a written DVIR at the end of the day, noting every defect discovered or reported. For property-carrying commercial vehicles, no defects found generally means no written report is required. Passenger-carrying vehicles follow a stricter standard: a DVIR gets completed, signed, and submitted at the end of every day, whether or not anything is wrong.
Here’s what that looks like in practice. A driver arrives for a shift, reviews the DVIR on file from the previous trip, and confirms any noted repair was certified before pulling the vehicle out. During the walk-around, they find a defect, a cracked mirror mount, note it in writing, and continue with the trip if it doesn’t affect safety enough to take the vehicle out of service. At the end of the day, that defect goes on a written DVIR. The next morning, a mechanic certifies the repair, and the following driver reviews that certification before they take the vehicle out. No defect found on a given day generally means no written report is required for that trip, for property-carrying vehicles specifically.
Once a defect is reported, the carrier has to certify it was repaired, or document that repair isn’t necessary before the vehicle goes back into service. Completed DVIRs and any related repair certifications need to be kept on file for three months from the date the report was prepared, whether that record is on paper or digital. FMCSA’s regulation at 49 CFR §396.11 was also updated effective March 23, 2026, to explicitly confirm that DVIRs can be created and maintained electronically, so a digital submission satisfies the same requirement as a signed paper form.
Getting this sequence backward is where a lot of fleets run into trouble. Requiring a signed written report every single day regardless of defects adds paperwork nobody’s checking, while skipping the driver’s pre-trip review of the prior report is how a known defect goes unaddressed for another day. The rule is stricter than a blanket “sign it every time” policy, but it’s also more specific about what actually has to happen at each step.
For a closer look at exactly when a written report is and isn’t required, see when a DVIR must be completed and signed, and for the driver-side inspection requirement itself, DOT pre-trip inspection checklist and post-trip inspection requirements cover each side of the process in more detail.
Paper DVIR Forms vs. Digital DVIR Checklists
Both formats are fully compliant, and neither one is inherently more legal than the other under current FMCSA rules. The difference is in how usable the record actually is once it’s filled out, and how much of the process depends on someone remembering to do a manual step correctly.
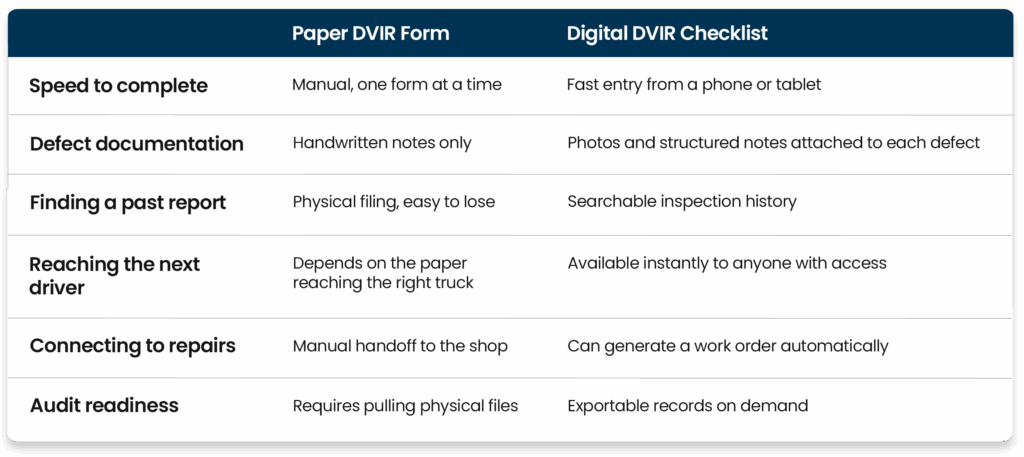
A paper form isn’t out of compliance. It’s just harder to turn into a usable maintenance record once a fleet has more than a handful of vehicles or drivers spread across more than one location. The compliance bar is the same either way. What changes is how much work it takes to actually use the records once they exist, and how confident a fleet manager can be that a defect reported at 6 a.m. on one truck actually reaches a technician before that same truck heads back out that afternoon.
Turn DVIR Defects Into Completed Repairs With Whip Around
A checklist and a signature satisfy the form. What actually protects a fleet, and keeps a vehicle out of a roadside out-of-service order, is what happens after a defect gets reported. Whip Around’s digital DVIR tools use the same categories covered above, built into a customizable checklist for any vehicle or trailer type, so drivers complete inspections from the what is DVIR mobile app instead of a clipboard.
When a defect is found, it’s documented with a photo and a note at the point of inspection, and it automatically generates a work order instead of waiting for someone to notice it on a form. Driver, mechanic, and next-driver sign-offs happen digitally, so the signature chain that’s easiest to lose track of on paper stays intact and visible. Every completed DVIR, defect, and repair certification is stored centrally and searchable, which is what turns three months of paper records into an inspection history a fleet manager can actually use.
For fleets that want to go a step further, AI Inspections Pro can automatically flag likely defects from inspection photos, and Wallet keeps related documents like registration and inspection certificates stored alongside the DVIR history itself. Neither replaces the checklist above. Both make it easier to trust that what’s on the form matches what’s actually happening with the vehicle.
DVIR Form FAQs
Can fleets create their own DVIR form? Yes. FMCSA doesn’t require a specific form or layout, only that the required elements, vehicle identification, the inspected systems, any defects found, and the necessary signatures, are captured. A fleet’s own form or a digital checklist built around those elements is fully compliant, which is exactly why the template above is meant to be adapted rather than used word-for-word by every fleet regardless of what they actually operate.
Can one DVIR form cover both a truck and trailer? Yes. A combined form can cover a tractor-trailer combination as long as each unit is clearly identified and any defects are recorded against the specific unit they affect, rather than lumped together in a way that makes it unclear which vehicle needs the repair. Some fleets prefer separate forms per unit anyway, simply because it makes routing a trailer-specific defect to the right shop or vendor more straightforward.
How long should completed DVIR forms be stored? At least three months from the date the report was prepared, along with any related repair certifications. Many fleets keep records longer for insurance, litigation, or internal maintenance history purposes, but three months is the federal minimum. A digital system that stores records indefinitely by default removes the risk of a fleet accidentally falling short of that minimum during a busy season.
Can drivers complete a DVIR without internet access? Yes. A paper form works anywhere, and most digital DVIR tools are built to capture an inspection offline and sync it once a connection is available, so a driver in an area with poor signal isn’t blocked from completing the report on time. The inspection itself, walking around the vehicle and checking each system, never actually depends on connectivity. Only the recordkeeping does, and a well-built digital tool handles that gap without forcing a fleet back onto paper.