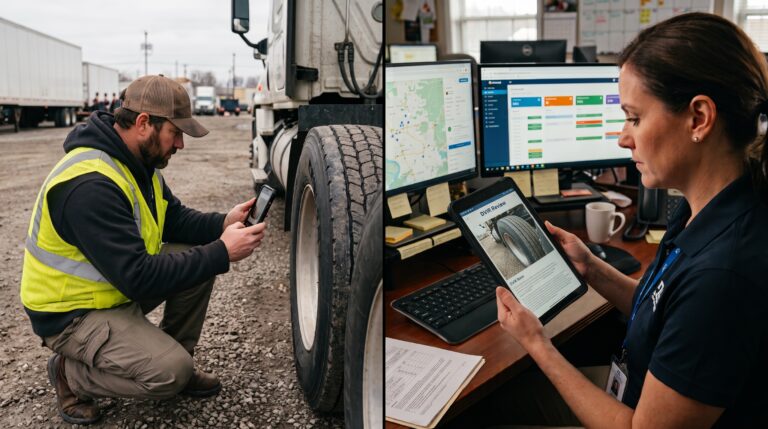
An excavator with a hairline crack in a hydraulic hose doesn’t announce itself. Neither does a skid steer with a worn brake line or a crane with a hook latch that’s starting to fail. On a jobsite, the equipment that causes the worst incidents is usually the equipment that “looked fine” the last time anyone glanced at it. A consistent construction equipment inspection checklist, run before every shift, is what turns that glance into an actual check — and it’s what separates a crew that catches problems on the ground from one that finds out about them mid-lift.
This isn’t a paperwork exercise. Heavy equipment downtime already costs construction projects an estimated $450 to $760 per hour depending on the machine, and industry estimates put as much as 30% of equipment time on a jobsite as idle — some of it planned, some of it because a machine that should have been caught at inspection sat waiting on a repair instead. Below is a practical, 10-step construction equipment inspection checklist you can adapt for excavators, loaders, skid steers, bulldozers, cranes, forklifts, dump trucks, and other jobsite assets, along with equipment-specific checks, retention guidance, and a downloadable version you can put to use today.
When Should Construction Equipment Be Inspected?
Construction equipment should be inspected before every shift it’s used, not on a weekly or “as needed” basis. OSHA’s general safety and health provisions, under 29 CFR 1926.20(b)(2), require that construction safety programs “provide for frequent and regular inspections of the job sites, materials, and equipment to be made by competent persons designated by the employers.” Equipment-specific standards go further: cranes, for example, require a documented shift inspection under 29 CFR 1926.1412(d)(1), completed before or during the shift the equipment is used, and any deficiency that constitutes a safety hazard requires the equipment to be removed from service until it’s corrected.
A genuine safety inspection checklist for construction equipment is a visual and functional screen, not a diagnostic teardown — it’s designed to catch the obvious, shift-to-shift problems: a leak that wasn’t there yesterday, a crack that’s gotten longer, a control that’s gone sluggish. Equipment also needs a fresh inspection any time it changes hands or configuration: after a different operator takes it over, after an attachment swap, after transport between sites, or after any repair, before it’s trusted back into service.
None of this replaces scheduled maintenance. A pre-shift inspection is meant to catch what’s changed since the equipment was last checked — preventive maintenance for construction equipment is a separate, planned process built around manufacturer service intervals, and the two are meant to work together, not substitute for one another.
Construction Equipment Daily Inspection Checklist: 10 Checks Before Startup
The following construction equipment daily inspection checklist covers the core systems that apply across most jobsite machines — engines, hydraulics, undercarriages, structural components, cabs, controls, and sign-off. Treat it as the baseline and adjust it to the specific equipment type and manufacturer’s operator manual. It draws on the same core categories used in broader heavy equipment inspections, adapted here into a single startup sequence.
1. Record the Equipment and Inspection Details
Start every inspection by logging the basics: equipment ID or unit number, make and model, date and time, operator name, and the current hour meter or odometer reading. This is the piece that turns a one-off check into an auditable record — the detail an OSHA inspector, an insurance adjuster, or your own safety manager will ask for after any incident. A paper log works until it’s lost or backfilled from memory at the end of a shift; a mobile form completed before the key turns closes that gap and timestamps the record automatically. The hour meter reading matters beyond the inspection itself, too — if your maintenance intervals are set by engine hours, this is the number that determines whether the machine is due for service.
2. Review Previous Defects and Open Work Orders
Before walking the machine, check whether it has any open defects or maintenance tickets from the last inspection. A machine with an unresolved issue shouldn’t quietly re-enter rotation because a new operator wasn’t told about it, and this happens more often than crews like to admit — especially when equipment moves between operators on different shifts or gets shuffled between sites mid-project. This step is where digital inspection tools earn their keep — in Whip Around, for example, a failed item automatically generates a work order instead of a note on a clipboard, so there’s no ambiguity about whether a defect was actually addressed, by whom, and when, before the equipment went back out.
3. Complete a 360-Degree Walk-Around
With the engine off, walk the full perimeter of the machine. Look for fresh fluid stains underneath, obvious structural damage, loose or missing guards, and anything that wasn’t there on the last inspection. Check that all access ladders, steps, and handholds are secure, and confirm decals, warning labels, and capacity plates are legible rather than worn away. This step is about catching what an operator would otherwise miss from the cab — a slow leak, a bent step, a loose panel — before it turns into a bigger problem once the machine is running and loaded.
4. Check the Engine, Fluids, and Cooling System
Check engine oil, coolant, and hydraulic fluid levels against the dipstick or sight gauge markings, and look for discoloration that could signal contamination. Inspect belts and hoses for cracking, glazing, or looseness, and check the air filter and radiator or cooling fins for debris buildup that restricts airflow — dust and debris accumulation is a constant issue on active jobsites and one of the more common causes of overheating that isn’t caused by a mechanical failure at all. A machine that runs hot or low on fluid on a hot jobsite day fails a lot faster than one that’s been checked every morning.
5. Inspect the Hydraulic System
Hydraulics run nearly every function on modern construction equipment, from bucket curl to boom lift to attachment control, which makes this one of the highest-consequence systems to check. Inspect hoses, fittings, and cylinders for leaks, cracking, or bulging, and check fluid level and clarity in the reservoir. A hydraulic hose failure under pressure isn’t a slow problem — it’s immediate, and it’s why any visible leak or soft spot in a hose should be treated as a stop-use condition rather than a note for later.
6. Inspect Tires, Tracks, and the Undercarriage
For wheeled equipment, check tire pressure, tread wear, and sidewall condition, and confirm lug nuts are tight. For tracked equipment, inspect track tension, look for missing or damaged track pads and rollers, and check the undercarriage for excessive wear or debris buildup, particularly around idlers and sprockets where packed dirt and rock accelerate wear. Undercarriage components are some of the most expensive parts on tracked equipment to replace, and catching uneven wear early is often the difference between an adjustment and a full rebuild.
7. Check the Frame, ROPS, and Attachments
Inspect the frame and structural members for cracks, and confirm the rollover protective structure (ROPS) and falling object protective structure (FOPS), where equipped, show no damage or missing hardware — these structures only work as designed if they’re intact. Check that attachments (buckets, forks, blades, booms) are securely pinned, that quick-couplers are fully engaged, and that the attachment matches the equipment’s rated capacity. A loose pin or a partially engaged coupler is a load-drop risk, not a cosmetic issue.
8. Inspect the Cab and Operator Safety Equipment
Check that the seat, seatbelt, and seat presence switch (where equipped) all function correctly, since these interlocks are designed to prevent unintended movement when the operator isn’t seated. Confirm mirrors, windows, and windshield wipers give the operator a clear field of view, and check that the fire extinguisher, if carried, is charged and accessible. This step is easy to rush, but a damaged seatbelt or a cracked windshield directly affects how well an operator can see and react to what’s happening around the machine.
9. Test Controls, Steering, Brakes, and Warning Systems
With the engine on, test the service and parking brakes, steering response, and all directional and attachment controls through their full range. Confirm horns, backup alarms, and warning lights all work — these are the signals that keep ground crew clear of a moving machine, and a disabled alarm defeats the purpose of every other precaution on this list. If a control feels delayed, sticky, or inconsistent compared to how the machine normally handles, treat it as a fail, even if it technically still functions.
10. Complete an Operational Test and Sign-Off
Run the machine through a short, low-load functional cycle — raise and lower the boom or bucket, cycle the attachment, and confirm smooth operation without unusual noise or vibration. Then complete the sign-off: record pass/fail for every item, document any defects with enough detail that a technician can act on them, and have the operator sign and date the form. A completed, signed record is what proves the inspection happened — and it’s what feeds directly into the maintenance work order process when something needs attention.
Equipment-Specific Checks to Add to the Checklist
The 10 checks above form a consistent baseline, but different construction assets carry their own inspection priorities on top of it. Use the table below to add equipment-specific items to your general checklist.
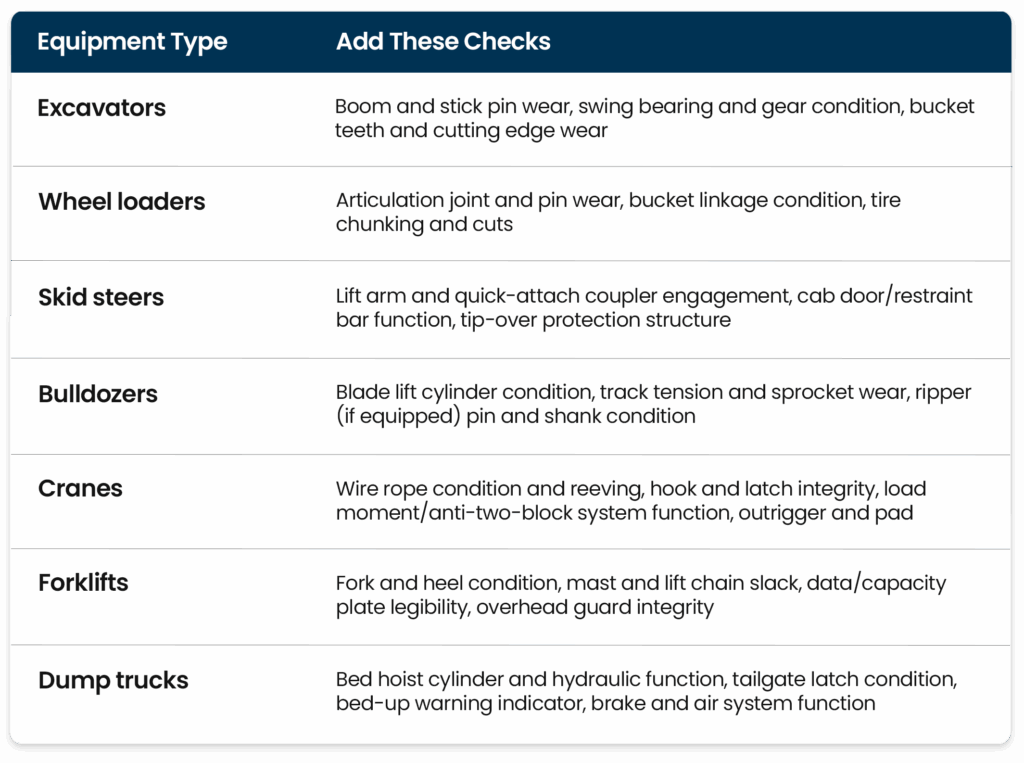
Cranes and forklifts carry additional regulatory weight worth noting. Crane shift inspections are a specific OSHA requirement under 29 CFR 1926.1412, not just a best practice, and forklifts are subject to design and inspection standards referenced in 29 CFR 1926.602, including ANSI/ITSDF B56.1. If your fleet runs either asset type, build these into a dedicated checklist rather than folding them entirely into the general form.
Standardize Inspections Across Crews and Jobsites
A checklist only works if every crew runs it the same way, on every jobsite, regardless of who’s holding the clipboard — or the phone. That’s harder than it sounds once a fleet spans multiple sites, subcontracted operators, and rented equipment moving in and out on different schedules. The most common failure point isn’t a missed inspection item; it’s inconsistency — one site skipping the hydraulic check, another logging defects verbally instead of in writing, a third with no record at all for a piece of rented equipment.
Digital inspection forms close most of that gap because they enforce the same required fields and checklist items no matter which supervisor or operator is running them, and because a completed inspection is stored and searchable rather than sitting in a site trailer or a supervisor’s truck. When a failed item can automatically generate a maintenance work order instead of a verbal note, it also removes the dependency on someone remembering to follow up. Photo capture adds another layer — an operator flags a cracked hydraulic hose with a photo attached, and whoever reviews it doesn’t have to guess how serious it is. For fleets running the same equipment types across several locations, standardizing inspections this way is what makes an OSHA inspector’s or insurance auditor’s question — “can you show me this was checked?” — a quick pull of records instead of a scramble.
This same consistency matters for construction equipment fleet management more broadly: inspection data that’s structured the same way across every site is what makes defect trends visible in the first place, rather than staying buried in individual site paperwork.
Download the Construction Equipment Inspection Checklist
Download Checklist – Click Here
Use this construction equipment inspection checklist as your starting point, and adjust the equipment-specific column to match the machines actually running on your site. At minimum, it should let a crew record equipment details, note whether previous defects were resolved, and walk through the engine, hydraulic, undercarriage, structural, cab, and control checks above — finishing with a clear pass/fail result and a place to describe any defect in enough detail that a technician can act on it without asking follow-up questions.
Whip Around’s mobile inspection forms are built around this same structure, customized to your specific equipment types and attachments. When an item fails, Whip Around can generate a maintenance work order directly from the defect so it moves to your shop instead of sitting in a notebook, and AI Inspections Pro can review submitted photos for issues a rushed walk-around might miss. Every inspection — pass or fail — is stored and searchable, which is what makes a documented history possible across a fleet of excavators, loaders, cranes, and everything else moving between your jobsites. Operator certifications, equipment registrations, and inspection records can also be stored in Wallet, so they’re on hand the moment a superintendent or auditor asks for them instead of buried in a site trailer filing cabinet.
Frequently Asked Questions
How long should a construction equipment inspection take?
A thorough pre-shift inspection typically takes 10 to 15 minutes once an operator is familiar with the checklist and the specific machine. Larger or more complex equipment, like cranes, can take longer given the additional items required under 29 CFR 1926.1412. The goal isn’t speed — it’s making sure every safety-critical system gets a genuine check before the machine starts moving.
How long should construction equipment inspection records be retained?
OSHA doesn’t set one universal retention period for daily equipment inspection records the way it does for certain training and medical records, but keeping at least a year of history is standard practice across construction fleets. That history gives you a defect pattern to reference for maintenance planning and gives you documentation on hand if an OSHA inspector or insurance carrier asks whether the process is actually being followed. Crane inspection records tied to periodic (monthly/annual) inspections carry their own retention expectations under 1926.1412, separate from daily shift checks.
Can the same inspection checklist be used for owned and rented equipment?
Yes, and it should be. Rented equipment still needs a pre-shift inspection before it’s put into service, regardless of who owns it or what condition it arrived in — the operating company is generally responsible for the equipment’s safe condition while it’s on their jobsite. Using the same checklist format for owned and rented assets keeps the process consistent and makes it easier to document that a rented machine was checked before use, which matters if a dispute comes up later about pre-existing damage or a defect that developed on-site. It’s worth doing a slightly more thorough walk-around on the first inspection of any newly delivered rental, since you won’t yet have a baseline for how that specific unit normally sounds, runs, or handles.
Running this process on paper works until a form goes missing, a defect gets reported verbally and never logged, or nobody can say when a piece of equipment was last inspected. If you’re ready to move your construction equipment inspections off the clipboard, start a free trial or book a demo to see how inspections, defect reports, and work orders can run from one platform.